Double Raspberry Pavlova

IMG_8588

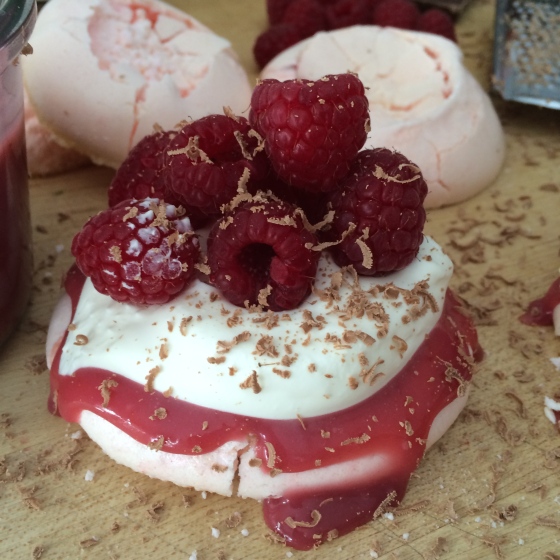
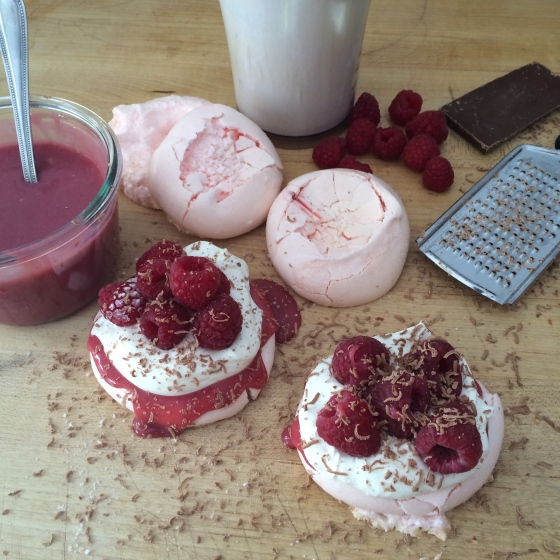
Perfectly pink meringue, sweet raspberry curd, fresh raspberries and tart creme fraiche are a wonderful marriage of texture and flavour in these little pavlovas. I have opted to make 6 mini pavlovas, however one large pavlova would work just and well and be equally delicious.

Serves 6

For the raspberry curd

6 oz raspberries (one carton)

2 egg yolks (save the whites for the meringue)

4 oz butter (1 stick)

6 oz Sugar

pinch of salt

In a pan over medium heat, whisk the egg yolks a little and quickly add all the other ingredients. Keep whisking until the butter and sugar is melted, keep this mixture moving or the eggs will scramble. Cook for another 8 minutes, stirring intermittently until the curd has thickened and coats the back of a spoon.

Pass the curd through a sieve to rid it of the raspberry seeds, and store in a little jar. The curd can be kept in an air tight container in the fridge for a couple of weeks.

For the meringues

2 egg whites

2 oz sugar

2 oz  sieved icing / confectioners sugar

Red or pink food colour

Heat the oven to 180℉.

Whisk the egg whites and a teeny tiny amount of the food colouring until the whites are stiff enough that they won’t fall if the bowl is turned upside down. Gently fold in the sugars.

Line a baking sheet with a silicon baking mat or a double layer of parchment paper brushed with a little oil.

The meringue can either be spooned out with an ice cream scoop or piped. You want to create a little indent in the centre either way.

For 6 mini pavlovas, I baked them for 1 hour, turned the heat off and left them in the oven for an additional 15- 20 minutes. A larger meringue will obviously take longer, set the timer for 1 hour 30 minutes and then check. If the tops are dry and crisp but the underneath still wet, carefully flip the meringues over, turn the oven off and leave, check every 10 -15 minutes. I like my meringues to have a little give in the centre.

Remove and let cool. These can be stored in an air tight container for 2-3 days.

Cream Topping

150ml/ 1/2 cup Heavy cream

75 ml / scant 1/3 cup Creme fraiche

Lightly whip the heavy cream and then stir in the creme fraiche. Set aside.

Assembling the pavlova

6oz fresh raspberries

1 oz dark chocolate

I like to crack the top of my meringues before filling them. It creates a lovely little nest to house the mounds of filling.

Spoon 2 tsp of the raspberry curd into the meringue nest, layer on a generous 2 tbsp of the cream, top with some fresh berries and grate on a little chocolate to garnish.

IMG_8587

Enjoy, F.

Double raspberry pavlova pdf

Strawberry Shortbread

I think shortbread has to be my favourite biscuit, they are buttery and crumbly, a perfect combination. The strawberries provide a little extra sweetness and bite to these moorish morsels. Makes 12 fingers

Ingredients:IMG_8519

1lb fresh strawberries

6 oz room temperature butter

3 oz sugar

6 oz all purpose flour

3 oz semolina/ pasta flour

Parchment paper

Baking sheet

9 inch square loose bottom pan, or equivalent

Pre heat oven to 170℉

Place the parchment on the baking sheet.

IMG_8496

Wash and hull the strawberries.

Slice the strawberries 1/4 inch thick and lay them onto the parchment paper.

Bake for 1 hr 15 minutes.  Turn the strawberries over and bake for an additional 1hr 15 minutes. Remove from the oven, the smaller slices will be ready now, the larger slices may require an additional 30 minutes. The slices should not be completely dehydrated, they should still be a little tacky to the touch and soft. They will continue to cook in the shortbread dough.

Heat oven to 300℉

Dice the strawberries and set aside, there should be roughly 4 oz of strawberries now.

Combine the butter and sugar until creamed together, add in the flours, and beat until just incorporated.


Add in the strawberries and beat a little more. Work the dough with your hands until smooth.

Press the dough into pan, push it all the way to the edges, and make sure it’s an even thickness, about 1/2 inch, you can use a smaller rolling pin or smooth glass to do this.

Prick the dough all over with a fork and pop it on the centre of the lower oven rack, bake for 55 minutes.

IMG_8512IMG_8513

Remove from the oven and slice into 12 even fingers and sprinkle with extra sugar.

When it’s cool remove from the pan and devour.

Here’s the printable recipe – Strawberry Shortbread

PinBerry

DIY: Easy Candy Corn Trick or Treat Tote

Done! The marker only looks pale on the left because of the light coming in from the window, its writes quite dark, and it doesn't belld, even on this thin cotton. Now you're ready to fill her up with candy! You can also stitch some scary black ribbon onto the handles if you wanted to....

What you’ll need:

Plain muslin tote

Freezer Paper

Pencil

Ex-acto knife

Iron

Paint brush

Fabric Paint in White, Yellow & Orange

Fabric marker in Black

halloween1

halloween2

Sketch out your design on the freezer paper. If you are making letters, numbers or words, make sure you’re drawing on the dull side of the paper.

I used a sharp Exacto knife to carefully cut it out.

I used a sharp Exacto knife to carefully cut it out.

Cut out and ready!

Cut out and ready!

Position it on your tote where you want it. I decided on the middle, tilted slightly in a jaunty fashion...

Making sure that the shiny side is down, position it on your tote where you want it. I decided on the middle, tilted slightly in a jaunty fashion. With a moderately warm iron, press the freezer paper onto the tote.

You don't need fancy brushes, I used these inexpensive sponge brushes to paint my fabric paint on the tote. I slipped an old magazine inside so that the colors wouldn't bleed through to the back side.

You don’t need fancy brushes, I used these inexpensive sponge brushes to paint my fabric paint on the tote. I slipped an old magazine inside so that the colors wouldn’t bleed through to the back side.

Once its dry, carefully peel the paper off and discard it.

Once the paint is completely dry, carefully peel the paper off and discard it.

So CUTE! Now you are ready to add some detail with your fabric marker.

So CUTE! Now you are ready to add some detail with your fabric marker.

Done! The marker only looks pale on the left because of the light coming in from the window, its writes quite dark, and it doesn't belld, even on this thin cotton. Now you're ready to fill her up with candy! You can also stitch some scary black ribbon onto the handles if you wanted to....


I hope you fill it up with loads of your favorite candy! -Marie

Vanilla Chai Cupcakes

These cupcakes are a combination of great flavours, tea and spice, sweet honey and vanilla.  I’ve made these several times and love them, but with most things I bake and cook it is a work in progress.

Makes 12 regular sized cupcakes and 24 mini cupcakes

IngredientsVanilla Chai cupcakes


250g vanilla sugar

225g butter

1 tsp ginger paste

½ vanilla pod

2 eggs

1 tsp vanilla extract

200 ml chai mix

¾ cardamon pods crushed up

4 English breakfast T bags

75 ml honey

¾ tsp black pepper

¾ tsp nutmeg


225g all purp flour

1tsp baking powder

1/2 tsp baking soda

3/4 tsp salt

Halloween cupcake papers

Butter cream

Purple food colouring

Halloween sprinkles

12 pumpkin lollipops


Pre heat oven to 350°

Vanilla Chai Cupcakes

Bring the chai mix to the boil in a saucepan, remove from heat and add in the t bags and crushed cardamon. Leave to steep for 10 minutes

Meanwhile…

Vanilla Chai Cupcakes

…Cream together the butter and sugar, and add in the ginger paste, mixing it in and scraping down the sides

Whisk together the eggs, vanilla extract and seeds from the vanilla bean, beat this into the creamed butter, sugar and ginger paste


Vanilla Chai Cupcakes

Fragrant spices, add the remaining spices to the flour along with the salt, baking powder and baking soda. whisk them together to remove any lumps and to incorporate them well

Vanilla Chai Cupcakes

Pour the tea mixture through a strainer and…

Vanilla Chai Cupcakes…Mix the honey into the warm tea.

Alternate adding in the liquid and dry ingredients to creamed butter and sugar mixture, Do this slowly and remember to scrape the sides and bottom

Vanilla Chai cupcakesspoon into the cupcake papers and bake the mini cupcakes  for about 20 mins, and larger ones for 25 mins

cool and ice


Butter Cream Icing

1/2 pint of egg whites, about 8 eggs

16 oz sugar

A pinch of salt

1½ pound unsalted butter, room temperature & cut into cubes

Set a pan of water on the stove to simmer away gently

Whisk, whisk, whisk

Put the egg whites, sugar and salt into a bowl. I use the mixing bowl of my kitchen aid  because later this requires a lot of whipping. Put the bowl over the simmering water and whisk, with a hand whisk, until the sugar dissolves and the whites are hot.

Sweet, frothy, slimy

Keep whisking, the last thing you want is scrambled egg whites.

Thick glossy white, can it get any better?

Transfer to the mixer and whisk on the second speed until you end up with thick glossy meringue. Keep going until the meringue is cold.

Only when the meringue is cold can you whip in the butter.  Add a little at a time, whipping on the second speed until all the butter is incorporated. Then increase to the third speed  and add the purple food colouring

Vanilla Chai cupcakes

Vanilla Chai cupcakesNow for the fun… decorating the cupcakes

Vanilla Chai cupcakes